By Francis Yannaco
As a time-strapped teacher or teaching assistant, technology can be your worst nightmare or your best friend. Here are 5 free tools that are intuitive and both easy-to-master and implement for a variety of situations.
Digital grading feedback: Microsoft Word Review
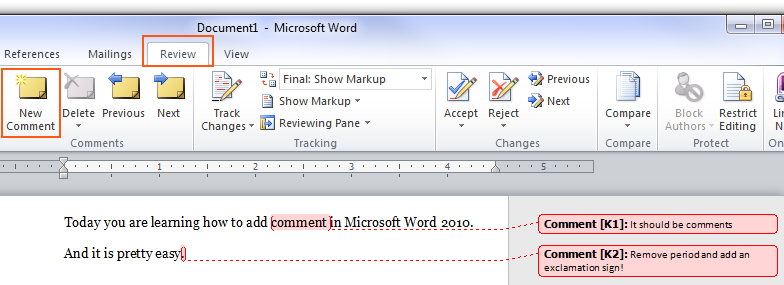
“What did you write here?” “Which sentence were you referring to when you said that?” “I lost the paper you handed back, can you tell me my feedback again?” These may not be commonly voiced problems, but are indeed problems for students. Unless you make class time to account for it many students may never refer back to and learn from your feedback. Emailing students a copy of Microsoft Word Review comments helps meet the needs of students’ digital study habits (and their often disorganized real-life study habits). You can follow up with a request that they clarify a question they have for you about their grade.
Instructions: Select the offending sentences. In Microsoft Office > from the REVIEW tab, click “New Comment” and type in feedback.
Digital grading calculation: In-House Excel Rubrics
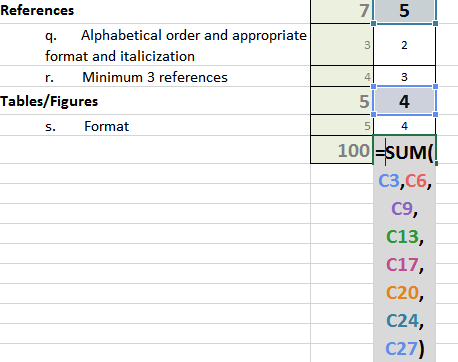
Do you spend hours adding up grades with finger-counting and complicated calculators? Save time with your own in-house Excel rubric. This rubric can also be copied and pasted directly into a Word document to be printed out or emailed to students. More advanced setups can allow you to automatically calculate class averages and course totals.
Instructions: Create a formula to sum up your rubric or its sub-sections, for example:
=SUM(C3,C6,C9,C13,C17,C20,C24,C27)
Download the worksheet as a template.
Alternative: Blackboard
Digital teaching: Narrate your PowerPoint
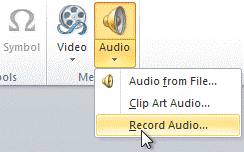
Are your PowerPoint slides useful as study tools in and of themselves? The PowerPointing of Education has its critics… Here’s one treatment: add a short audio narration to your PowerPoint to summarize the key points and mix some verbal context into those bulletpoints.
A few studies in the 1980s examined the effect of teachers verbal expressiveness and inflection (which means change in pitch, loudness) on teaching outcomes (Marsh, 1984), concluding that it was more important the content itself! While that claim may not pan out, the initial evidence points to expressiveness being very important for comprehension. When students review notes and slides they may find your expressiveness to be a very welcome companion.
Instructions: In PowerPoint > from the INSERT tab > go to Audio > Record Audio. Microphone required.
Marsh, H. W. (1984). Students' evaluations of university teaching: Dimensionality, reliability, validity, potential biases, and utility. Journal of Educational Psychology, 76(5), 707-754. doi:10.1037/0022-0663.76.5.707
Magnifier: In-Class Computer Instruction seen clearly, now
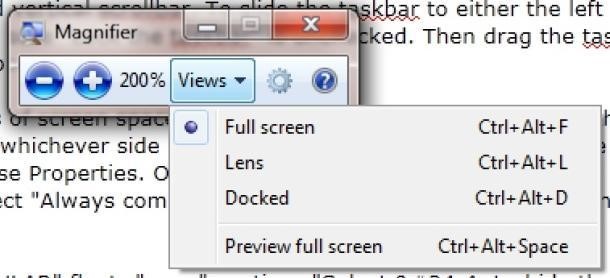
Students come into your class with all different levels of visual acuity. Windows 7’s Magnifier is a tool that enlarges the size of the area of the screen where your mouse is. By moving your mouse you can point to the relevant part of the screen that your students should be looking at. Besides its value to differently-abled students this tool also helps viewers to jointly attend to the on-screen information that you’re attending to.
Instructions: From the start menu, search for “Magnifier” > going to “Full Screen” magnifies the whole screen, “Lens” creates a magnifying lens, and “Docked” docks the zoomed image at the top. “Docked” mode is least obtrusive.
PowerPoint boost: Storyboard That

Did you ever have a point that you wanted to illustrate using characters or dialogue? Did you ever say “This stick figure resembling a tree branch is supposed to be a little boy”? Storyboard That! There are many other free story-boarding tools, but storyboardthat.com is a quick-pickup tool that can liven up a dull PowerPoint and bring home an idea visually.
Instructions: visit StoryboardThat.com > Click “Create StoryBoard” and start dragging in scenes, people, and “textables.” Dragging and adding text operates like PowerPoint. Limitation: you can only make 3 per week. http://www.storyboardthat.com/
Screenshots courtesy of the snipping tool. Free and paid alternatives to all of these tools can also be found on alternativeto.net.
